Embellishing an Upholstered Chair with Doilies
If you’ve ever wondered what can you use an old stash of doilies for? What about creating a cute cottage piece of furniture and embellishing a chair with them? While in the past, they might have screamed “grandma”, there is something about a handmade, cottagecore look that a doily can bring , especially when decorating in a little more… cottagey. While vintage doilies are handmade from an old world skill called “tatting” which is a method of lace making, newer doilies from the craft or fabric store are machine made and can be more easily found and made with heavier, more durable materials. If you have ever watched anyone tat lace, it’s not only impressive but amazing. It’s certainly a skill that is being lost due to machine innovation.

You can see in the image above how heavy the wood chair looks. The chair has some great “bones” so painting it and giving it a make over will make it even more updated.
First Prep and Paint the Chair
I wanted pretty, eclectic looking chair and and I knew I wanted light.. and maybe stripes, and I wanted to add a more delicate, handmade look. That’s when I knew I wanted to add some lace doilies. I mixed new and old doilies in my chair makeover. I had found not only several vintage ones, but new ones I had found in a bin at the craft store. The first step was to remove the cushion and then painting the frame of the chair. You can see a tutorial here on how to paint a chair frame.

Place and Sew Doilies onto the Fabric
Once the chair was painted, cut the fabric to the size needed and machine sew or hand stitch the doilies onto the fabric first. You can try hand sewing them on after, but they may not be as secure. Though it is a good option if you ever want to remove them at a future date, or if you want to add them to piece of furniture without reupholstering (you’ll need a curved needle for that). You may want to play with placement first before sewing. If you’re worried about wear and tear, place the doilies in spots where they are less likely to make direct contact with people sitting and more off to the sides or on a chair with upholstered arms.

Reupholster the Chair with the New Fabric
I then reupholstered the cushions and seat with a neutral, striped fabric. The chair seat had two parts and I ended up covering over both of them. by wrapping them. To finish off the top, I hot glued a woven trim to clean up the edges where the fabric meets the wood.It’s now a serene blue with tan striped ticking. The lace trim on the bottom was glued on where the edges meet add a pretty touch and to cover any rough edges .
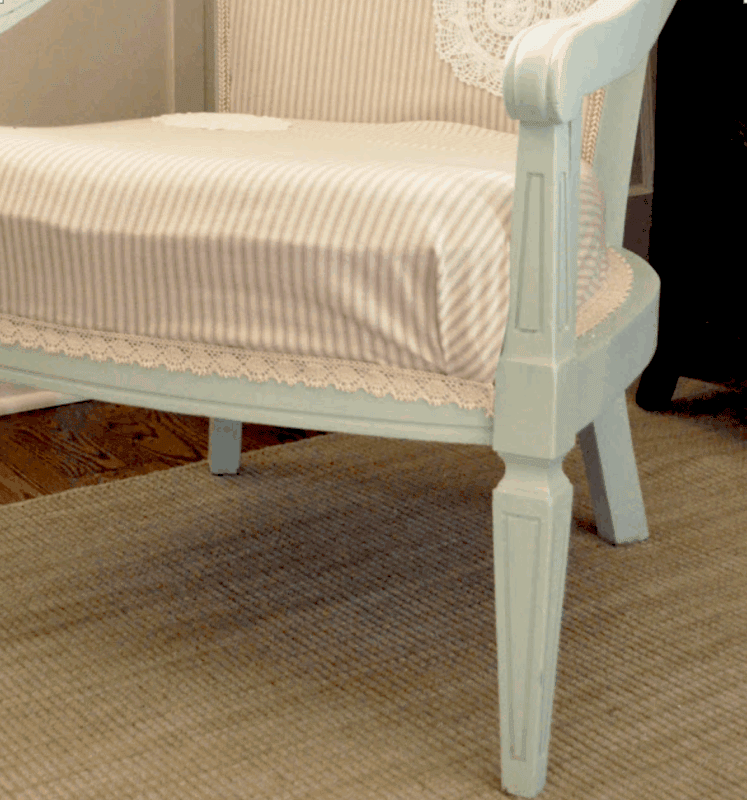
I love how the vintage doilies in two difference sizes really play against each other and add interest with the striped fabric. It really gives it a sweet cottage feel with the light blue chair frame.

Reupholstering the chair, painting it and stitching doilies onto the fabric a great furniture makeover and easy to make it look like a new piece of furniture!

Jen
If you are reading this post at any other sites or blogs besides Jenniferrizzo.com, your rss feed,e-mail or in your reader this is stolen content.
*This was posted Via Jennifer Rizzo. com
I love it! I like it when people think outside the box.
Yep, it’s pretty much perfect! Next thing you know you’ll see a similiar chair in Anthropologie……..:)
I LOVE it! Perfect :))
LOVE your doily chair~It is darling!;)Hugs,Rachel
French Farmhouse 425
Love it! You did a beautiful job, Jennifer!
Really lovely chair,that reminds me,
I have a project that needs Starting!
Hi Jen,
I LOVE your chair!
It is perfect!
I LOVED your post about blogging… I needed to read that! It was perfect timing for so many of us..
Thank you!!!
Have a great week!
Take Care,
Maria
p.s. Tracey is always bragging about how talented you are!
It’s just perfect. I love how you describe the chair as mocking you. There’s lots of that going on around here also, so I can relate.
So beautiful! You are SO talented! I am really looking forward to the opening of your new etsy store.
Best~
Karen
it’s perfect. i have a doily pillow that kind of looks like that. i love it jen.
Aw, Jen!! It’s so pretty! I love everything about it! I wish I had your talent. 🙂
Hope you have a wonderful day!
Beth.
It’s charming Jennifer! 🙂
Ooohh…sounds like some juicy news coming our way! Can’t wait to hear!
And disregard the email I sent you, I heard from Anne.
The chair looks great!
Mary
Well, I’ll never look at a doily the same again….thank God ! Great chair.
as for the untucking thing— try putting a thick piece of rope or dowel or something in the crack to hold it down. that might work? love it!!
Beautiful and original. There are many bloggers doing beautiful projects, but not all are original. You constantly have inspiring ORIGINAL projects. Wonderful!
This is fabulous! I love the fabric, the paint color, oh my!
Lucky I don’t know where you live or I might have to borrow it :)XO
I love the doily chair, you did an incredible job. I’ve been trying to incorporate doilies in to my projects, I just finished some pillows, but I’m having a hard time finding the doilies, can’t find them anywhere (or is it that everything is hard in Utah LOL!) would you mind sharing where you buy them?
It looks like a completely different chair!
Great chair! So different from anything else I have seen.
So cute! Love the doilies!
Oh it’s soooo darn sweet!! loving it,
xo,
LuLu
Now that would look nice in my sunroom…or bedroom..can I have it!!!! Really do like the look of it! x0
Hi Jen,
I knew when you finished the chair it would be amazing and it is. I love your unique sense of design. Can’t wait to hear who came to visit! Take care sweetie.
Pat
love everything about it…she’s
perfection!!
Jen, very cute did you get the doily from your mom they look like there form Italy.Have a great weekend
~~Pattie~~
The Shabby Chick
Love that chair. Now I just need a cup of coffe and a good book and I’ll be set!
Your chair turned out beautiful, Jen! Love the bit of whimsy the doilies at to it.
Thanks again for your post that you did about the stress of blogging. It really helped put things in perspective for me. 🙂 Thank you, too, for your supportive comments at my place. I appreciate them so much. 🙂
Have a great weekend!
xo,
Jo
very very cute. I have to look up alot of proper spellings too.
megan
craftycpa.blogspot.com