How to Make a Paper Mache Bowl DIY
I’ve seen rustic paper mache bowls popping up all over in the design world, and they look so cool. I love working with clay and mache products, so I thought I would give it a try to make a paper mache bowl DIY of my own and share how to make a paper mache bowl base with you in a couple of hours. You can watch the video below for a more in-depth details, or go by the step by step images below.

This post contains affiliate links. See our sponsor and affiliate disclosure here.
How to make Paper Mache with Strips of Paper
While some DIY paper mache recipes call for 1 cup flour, 1 cup water, 1/2 cup white glue, the addition of 1 tsp salt to help prevent mold formation. You can use any kind of paper to apply the paper mache by dipping the strips in the mixture and smoothing it on a object. This works really well old school style with layers of newspaper. That mixture would be used as a glue to place layers of paper together, such as newspaper strips, paper napkins, old books, and even toilet paper (This bowl was fun and easy to make using a pre-mixed paper mache pulp product I found.). Even though it took several days of dry time, my DIY paper mache bowl turned out to be really cool. Even though it’s not for food use or wet applications, It’s such a fun decorative piece… we actually keep our TV remotes in ours!
Making Paper Mache with Scrap Paper
Paper mache can also be made by soaking old letters (put through a paper shredder), cardboard and other paper in hot water over night until the fibers soften. It can then be blended in a blender (no longer used for food!) until it creates a paper pulp. Then equal parts water and glue mixture can be added and mixed to create a paper mache dough for various projects. Think bowls, ornaments, decorations and more!

Creating with Paper Mache
I have the instructions below and a few tips that make the process much easier! You can also watch the video for the full instructions and the bonus video to see how the foot of the bowl and rim of the bowl is created up-close. There are lots of ways to makes and style these paper mache bowls as seen on both Instagram and Pinterest.
How to make Paper Mache from a Mix
To make your paper mache bowl. you’ll need: Paper mache paper pulp pre-mix, a tub to mix it in and water, small bowl or jar with water , clay tools, a large bowl mold wrapped in plastic wrap or aluminum foil as a “mold”, a dust mask and possibly eye- protection, paper towels. Find supplies here. I grabbed a few in progress still shots from the video so you could see a few more steps.

How to Layer Paper Mache to Create a Bowl
Old School Paper Mache is made with newspaper strips, shred paper and white glue which can be messy. This paper mache project is different than the old school paper mache from when I was a kid. We would take newspaper strips, equal parts of a cup of water and a cup of flour to create a paper mache paste and add a cup of white glue.
Use an Old Bowl Covered in Plastic Wrap as a Base Mold
By covering over our item in cling film and a bowl for a mold (or even a balloon to make a pinata!). It’s almost like a wallpaper paste. You can still make a paper mache bowl that way like mixing the flour and water until it has the consistency of pancake batter, and then letting your newsprint soak until its somewhat saturated. Once the strip of newspaper is saturated, create layers by adding one strip and crossing over another. Continue to build up layers of soaked newsprint paper, smoothing as you go. Let it dry for several days, and then it can be trimmed with scissors and then painted with craft paint and sealed with decoupage medium or varnish. While this paper mache technique is fun (and messy), it has a few downsides… One, the layers can de-laminate when painted and after the first layer, if the layers are too thick, it can mold instead of dry. Two, the paper can easily fall a part when using, or if it’s not soaked enough, won’t adhere to the layer underneath. The third issue or an organic one. Anything with part flour in it can attract pests and bugs that like to eat flour, so if you want to keep your paper mache bowl a long time, that could be an issue ( and if you have a gluten-intolerence, you may want to use a different recipe as well.). All I can say, as kind those were fun projects, but from a parent’s point of view, they were probably a disaster with a headache-inducing clean up. I might try this project again one day, but for now, I’ll stick to my pre-mix.
Mix the Paper Mache to a Dough-Like Texture
This paper mache bowl is definitely a more mature, high end version. To start making your paper mache bowl with bowl with pulp dough, wrap your large “mold” bowl in plastic wrap or use foil-covered bowls(This will make it easier to remove your paper mache piece later. ) Set aside until your paper mache mixture is ready. Mix your mache compound according to the instructions squeezing the water into the mix. The mixture seems to kick up a lot of dust so wearing a dust mask is advised. Once your mixture is thoroughly mixed, and all of the small, dry lumps are worked out, start by taking clumps and flattening them slightly. Mold them around the outside of the bowl until they are a uniform 1/4 to 1/2 inch. the mixture should be mixed thick enough to “grab the bowl”. If it’s sliding off it’s has too much water and needs more paper mixture. Use a little water to smooth if needed.

I found by placing paper towel or parchment paper under the DIY paper mache bowl before working made it easier to form the rim of when making your rounded shape at the top of the bowl.

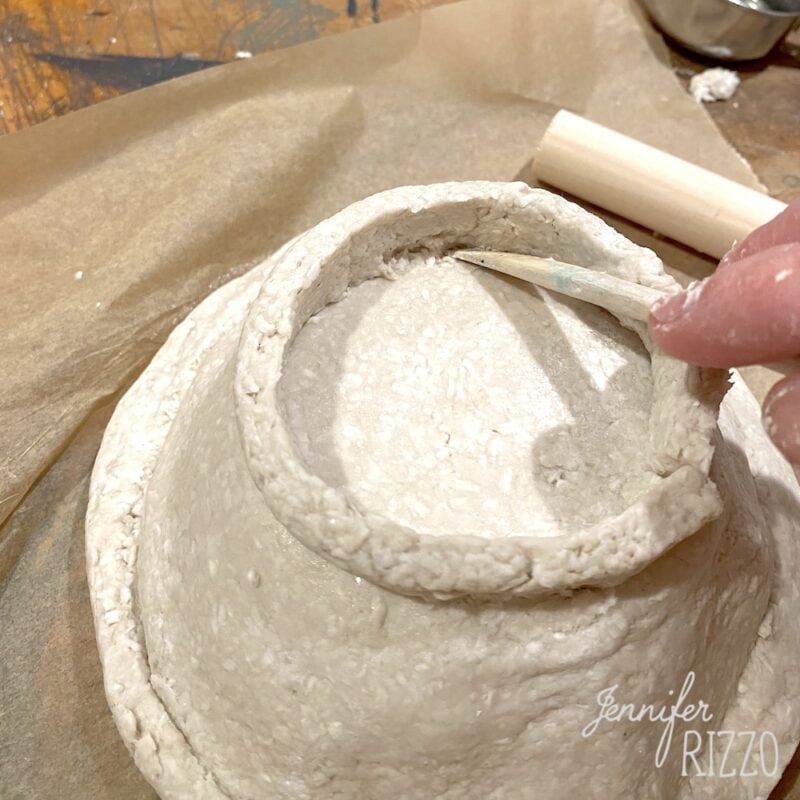
Once the Bowl is Formed, Add the Upper Rim
After the entire bowl is formed around the mold and smoothed out (This is where a small bowl of water comes in handy. Keeping your fingers wet help it to smooth and glide over the paper mache mixture), make two “snakes” with the mixture and press them flat to form a thick rim detail at the top and at the bottom foot using your clay tools (or the round end of the back end of the paintbrush) to help adhere them.
Let the Paper Mache Bowl Dry Completely Before Painting
Once this step is completed, place in a flat place and let it dry over a few days. I placed a monitored fan on mine during the day to help it dry faster.

Once the outside is hard, carefully flip it over and remove the bowl from the inside (This is where that plastic wrap really helps!). Place paper towels in the inside of the bowl form and carefully set your paper mache bowl inside, using paper towels (or plastic bags) to help support the sides and underneath so the inside of the bowl can dry without warping.

Once the bowl is dry, any cracks can be sealed with paper clay or air dry clay. Let dry fully and then it can be painted with acrylic paint.
Seal the Paper Mache Bowl or Decorative Item
While you can make paper mache water-resistant, it cannot be waterproofed or food safe. This is a decorative item only. Once it’s sealed with clear sealer such as a clear matte varnish or non-yellowing polyacrylic or left in its natural state. It can be used to display and hold items such as decorative objects, keys, jewelry and more! I see these sell on Etsy for close to $100, so they are definitely worth the creative time to make one! I paired this with a cute handmade bead garland.
It’s been surprisingly durable and it was fun to make a paper mache bowl to really use. I really thought the family would have it smashed to bits in a few days, but it’s held up really well!

Have fun getting messy and creating something fun!
If you liked this post, you might also like how to make a leather wrapped bottle vase.

