If you have a table with a damaged top, decoupaging a table top with fabric is a great an inexpensive solution! And a decoupage table top is pretty too. It’s very easy to decoupage fabric or paper onto a table top with a few tips and tools.
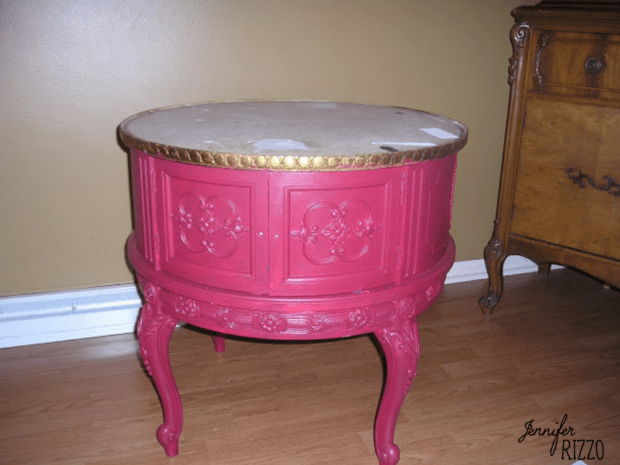
Decoupage (gluing paper, fabric or other textiles for embellishment) is a great way to fix or enhance a table surface. It can hide blemishes or spiffy up a dull top. There are just a few simple steps and supplies. I had this table in storage and because of the damaged top, I wasn’t sure what I wanted to do with it. It had a hole where a glass top would go and it was super-dated but had a kind of cool shape and detail.
Because of the damage on the top, I knew decoupaging fabric on it was the perfect way to fix it and make it usable again. Make sure to paint before decoupaging. You can read the best way to paint furniture here.
I started with the base coat of red paint*If you are going to paint the piece, like I did, it is best to do that step first and do the decoupaging after the paint is cured. Do not paint the area to be decoupaged. Fill any damaged areas with wood filler. Sand your surface. If it is a leather top, sand it until all of the shine is gone. I normally wet-sand to cut down on the dust. Cut your fabric to fit. If the edge isn’t perfect don’t worry, that’s where your braided trim will come in.
.
Apply the Decoupage Medium
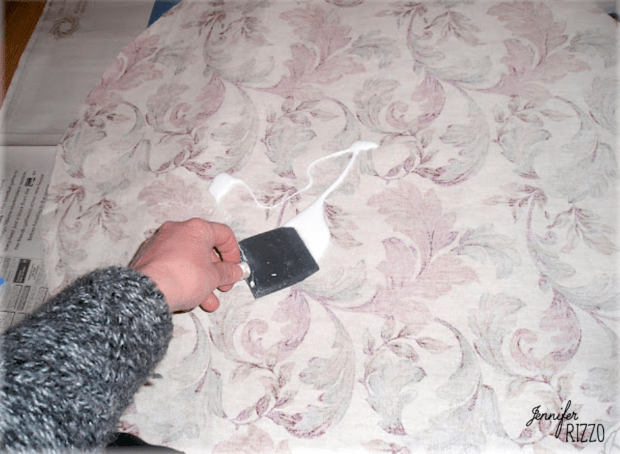
Apply Mod Podge to the entire top.Then apply the decoupage medium to the back of the fabric. Work quickly, as it can dry fast.
Lay the Fabric on the Decoupage Medium
After completely covering the surface in medium, lay your fabric on the surface being careful not to stretch it. Use your hand to push out all of the air bubbles and excess glue. If you leave either under the surface it will dry that way. If you need to reposition your fabric, pull it up gently, and reapply the medium. It may stretch the fabric slightly, so it is better to put it on right the first time.
If it seems like there is a bubble you just can’t get rid of, use a pin to poke holes in the top and then push them out again. After all of the bubbles are out, spread another layer of medium completely over the surface. Let dry.
Seal and Paint if Desired
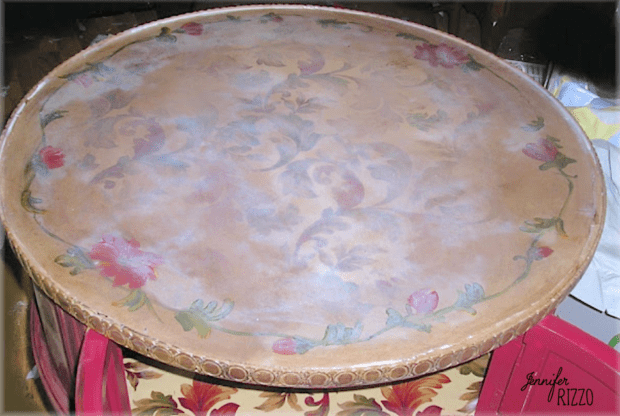
Now is the time you can treat the decoupaged fabric table top like a canvas as I did with acrylic paints on top.I lightened my fabric with a cream and aged brown wash and added a floral motif to match the sides. If you do, let the paint dry completely before adding the next layer of medium. Otherwise, you can leave it as is and move on to the next step.
Add another layer of decoupage medium and let dry.Spread on a layer of a protective medium such as water-based varnish or polyacrylic. Follow the manufacturer’s instructions. I normally add 2-3 coats of a satin finish. I would definitely recommend doing this part in a very well ventilated area.I normally do this part in my garage because it’s stinky and I don’t want the kiddos breathing it.
It will appear blue or cloudy, but will dry clear. Depending on the use, I put 2-3 coats on, following the manufacturer’s instructions.After dry,the surface may have slightly rough feel to it. The more layers of polyacrylic, the smoother it will get.
After the varnish/poly has cured, use a tacky craft glue to glue your braided trim around the edge. This will hide any rough or unevenly cut edges.
Apply a Trim Around the Edges
Clean the excess glue off with a slightly damp paper towel. Enjoy your table top. It’s ready to be used in about 48 hours.
I then painted the top and the sides to match for my client. If you have any questions about decoupaging fabric onto furniture, or the decoupage table top, please feel free to send me an e-mail. Also, if you do this project, please send me a picture or if it’s a post let me know…I’d love to see your results!
I have a particularly ugly end table. It’s that style where you have a cubby hole underneath the top w/ a drawer below that. Hope that gives you a visual picture of what this piece looks like. What I’d like to do is decopage fabric into the cubby hole and inside the drawer, then paint the rest w/ a complimentary color. I have some pretty fabric I picked up at a yard sale. It feels like cotton, is medium weight, and is a small plaid in fuschia, purple, white, and a darker purple. Thought I’d paint the piece either hot pink or one of the purples, depending on what I have on hand. My other thought was to (after a thorough sanding) was to use a hot pink opaque stain. Do you think this fabric is heavy enough? Any thoughts or suggestions concerning the painting vs. opaque stain? I always sand everything first anyway, so that doesn’t really add much time to the overall time expenditure on the piece as a whole. Oh, I will also mention, at the moment, this piece was originally stained a dark color like walnut which is one of the reasons I hate it so much. I also was going to stencil the top w/ zoo animals as I see this piece that would work well in a childs room. It’s small for an end table and the cubby would give the child a place to put books, stuffed animals, etc. I thought the addition of the stenciled animals would appeal to a buyer, looking for an end table for their son or daughter. I’m sorta leaning toward using purple as the main color so it would be more unisex than hot pink. Altho the hot pink would be really cool. I love the fabric and if Iknew how to sew, I’d most likely make myself an article of clothing out of it, I have several yards but only paid like a couple bucks for it. Any ideas would be welcome. Oh, should I paint the interior cubby w/ a white so the dark couldn’t show through if this fabric isn’t quite heavy enough to cover that ugly dark stain or do you think sanding will suffice? Thanks so much. Just email me if you have any suggestions for me. Thanks again. Jen


Great tutorial Jennifer and I linked it to my sidetables project post too!
That looks so pretty!
Good job.
I popped over from Inspire Me Heather…this table is so beautiful. Thanks for the tutorial, I’m certainly going to give this a try.
Wow you did an amazing job! Thanks for the tutorial.
fab table and easy to understand,I think lol.
I love the idea and the project. Was hoping to see the final results when done. Will have to try this someday.
Beautiful tutorial, but I wish you had included a final picture of the whole completed project. Great tutorial though!
I have a particularly ugly end table. It’s that style where you have a cubby hole underneath the top w/ a drawer below that. Hope that gives you a visual picture of what this piece looks like. What I’d like to do is decopage fabric into the cubby hole and inside the drawer, then paint the rest w/ a complimentary color. I have some pretty fabric I picked up at a yard sale. It feels like cotton, is medium weight, and is a small plaid in fuschia, purple, white, and a darker purple. Thought I’d paint the piece either hot pink or one of the purples, depending on what I have on hand. My other thought was to (after a thorough sanding) was to use a hot pink opaque stain. Do you think this fabric is heavy enough? Any thoughts or suggestions concerning the painting vs. opaque stain? I always sand everything first anyway, so that doesn’t really add much time to the overall time expenditure on the piece as a whole. Oh, I will also mention, at the moment, this piece was originally stained a dark color like walnut which is one of the reasons I hate it so much. I also was going to stencil the top w/ zoo animals as I see this piece that would work well in a childs room. It’s small for an end table and the cubby would give the child a place to put books, stuffed animals, etc. I thought the addition of the stenciled animals would appeal to a buyer, looking for an end table for their son or daughter. I’m sorta leaning toward using purple as the main color so it would be more unisex than hot pink. Altho the hot pink would be really cool. I love the fabric and if Iknew how to sew, I’d most likely make myself an article of clothing out of it, I have several yards but only paid like a couple bucks for it. Any ideas would be welcome. Oh, should I paint the interior cubby w/ a white so the dark couldn’t show through if this fabric isn’t quite heavy enough to cover that ugly dark stain or do you think sanding will suffice? Thanks so much. Just email me if you have any suggestions for me. Thanks again. Jen