Making DIY Tea-Dye Tags
Today is the perfect fall weather. A little warm and breezy, with just a touch of underlying coolness. The sun is shining and someone is burning so there is a bit of campfire smell. I’ve been busy Making DIY Tea-Dye Tags. These are easy and fun to make. They can be used for gift giving, collage or even junk journaling. If you’ve ever wanted to tea dye tags or paper, here’s a tutorial for you.

Supplies for Making Tea Dye Tags
-Heavy duty shipping tags
-Strongly brewed tea or coffee-cooled about 1/2 gallon
-Container
-Place to hang tags or let them dry flat
-A weight like a small river rock
-Stayz on stamp pad
-Stamps
Pre-Stamp Tags
If decorating tags, pre-stamp with design of choice and Stayz On ink. This way everything gets dyed together. Don’t use a water-based ink, it will bleed in the water. They can be stamped after if desired.
Tea-Dying Paper or Tags-First Brew Strong Black Tea
Brew black tea to a very dark color and letting it cool. After it’s cooled pour into a flat, open container.

Place Tags Into Tea
Seperated tags and place into the tea one at a time. If you put them all in together they may stick and dye unevenly. After placing all of the tags in the tea, let your heavy card stock tags sit and soak for at least an hour, placing a heavily weighted item on top If you don’t want your string dyed, remove them before immersing them in the tea bath. You may need to use a rock or weighted item like pebbled in a plastic container to keep them from floating. If you are using paper or a thinner cardstock, only let it sit for a few minutes.
Remove Tags From Tea And Let Dry
After they have reached the dark color you would like, hang them up somewhere to dry. They need to either be hung to drip dry, or they can be laid out flat on an old towel to dry. if laying on a towel they will need to be flipped over to a fresh towel once the top is dry to let the underside dry. I had hung them on my clothesline to dry.
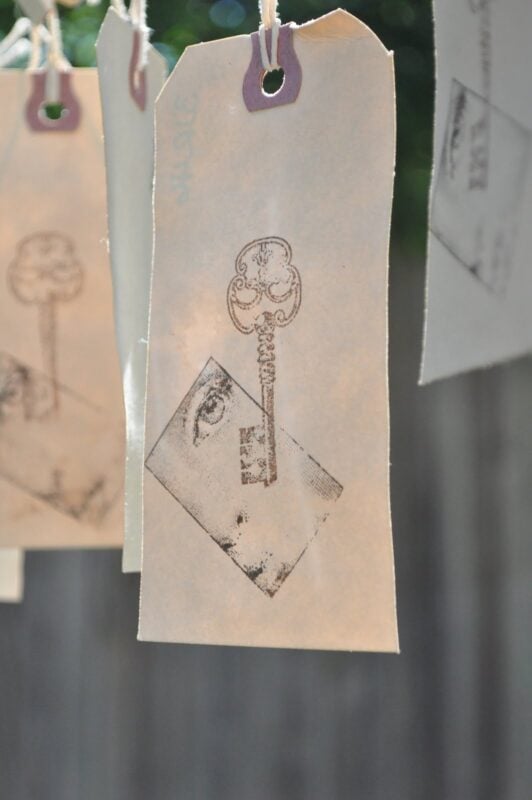
The sun was at just the right angle to give then a kind of glow. They dry a little lighter than they appear when they are wet, descending on how long you soak them for and the thickness of your paper they may buckle and warp a bit. You can always press them flat later if they warp.

I love the pretty warm tone they are, and how they transform the manilla colored tags. They also have a earthy tea smell to them which I love and can be used for all kinds of projects!

If you are reading this post at any other sites or blogs besides Jenniferrizzo.com, your rss feed,e-mail or in your reader this is stolen content.
*This was posted Via Jennifer Rizzo. com
I have always loved seeing laundry drying on lines in the breeze. How wonderful to see your tags!
Hugs,
Penny
i’ve been thinking so much about bridgette and the girls who are telling her story, may the prairie whisper her truths to you…so wish i could join you…
your tags are absolutely amazing!!
prairie hugs,
kristin
btw~where did you get your face stamp? have been looking for one everywhere..
I know you must be working like a mad woman!!!
Jennifer,
Those tags are really pretty. You could probably sell the photos you took of them drying too.
I wanted to share a book with you that I know you’d be interested in. It’s the Omnivore’s Dilemma by Michael Pollan. It’s definitely full of more information than any one person would want to know, but NEEDS to know, about what we’re having for dinner. Literally! From grains in America, farming, soil fertilization; he follows a steer from weening to slaughter and documents the cows life, how he’s feed, where it comes from, what’s put in his food and that’s just the beginning of the story. It’s quite an enlightening read and all true. I follow your other blog but can’t seem to find it or I’d post over there. You of all people will appreciate this book.
Blessings,
Shanna
those tags are so cute – are you going to let the buyer take them home? I think they would like that!!
they are almost keepsake 🙂
looooong night last night – clean up day today – and then ‘diving in’ tomorrow………….
Ahhh, to be at the NaDa sale with some of my most favorite people!
I usually am thankful for being a Texan, but I’d give my right-something to be a mid-Westerner every once in a blue moon. 🙂
Beautiful tags!
XO,
Anne
Your tags look wonderful, I so wish that there were events like what you are going to here in NZ…..
I’ve used the key stamp over and over and over … a favorite for a couple of years … it somehow always makes me smile …
I love them as art … that’s you, Jen
These tags are gorgeous – perfect on the clothes line!
Those are sooo cute! I love tea-stained tags! When I was at the last Na-Da barn sale I bought a ladder that I think had that same cage stamper on the tag! 🙂 I can’t wait to see all of everyone’s lovely work!
🙂 Lara