How to make a DIY Gold Leaf Mirror
Hi everyone, it’s Jamie from So Much Better With Age. Before I begin with today’s diy project , I must apologize for something. As a contributor for Jennifer Rizzo.com, I try to think of a great DIY project or craft that you, the reader, will enjoy.Then sometimes the time comes around to actually make that project and it all falls apart.But guess what? The best part about epic fails is that epic fails turn into a thing of beauty (at least I hope they do!)Because today’s post was…you guessed it…an epic fail turn into something amazing with a DIY gold leaf mirror makeover! While gold leafing is awesome to add touches of gold, it can be a little more expensive, but you can normally find a coupon or two.

I used a dark brown wood convex mirror. I’ve had it for many years and love it. It’s been in nearly every room in my house including my living room until one day it made it’s way to my crawl space where it stayed; It was just a little too dark as my floors are really dark in my house. It needed brightening up. I thought why not put some gold leaf on the inner circle?

I started with these supplies:
-
- gilding sheets (gold leaf sheets) Or try copper leaf!
- gilding adhesive
- at least two soft brushes (or small foam brushes)

First, I brushed on the a thin layer of adhesive to about half the area I wanted to cover. Wait a few minutes for the glue to get tacky. It needs to be sticky to touch for the gold leaf to stick (It will also stay forever tacky, so if there is an area that you put the adhesive on and don’t add gold leaf to, you need to either seal over the adhesive or remove it. ). Press the gold leaf down onto the glue and press into surface, then gently lift backing up. The gold leaf should stick easily to the glued surface. Keep pressing down and lifting up all around until the area is filled. You can even use small flakes to fill in the little areas, you don’t need to waste an entire sheet of gold leafing.
Tip: If you don’t want to try gold leafing, you can also use Rub n Buff
EEK! That’s a bit too gold for my liking. Darn it. Now what am I going to do. You know what? I should have painted it white first. That would have looked much better, white with gold accents.

But first, wait one hour and then brush off with a soft brush the gold leaf bits that didn’t stick so all of the loose ends are completely removed. I like to do this over a surface I can collect them on. Make sure to keep the leftover flakes for other projects!

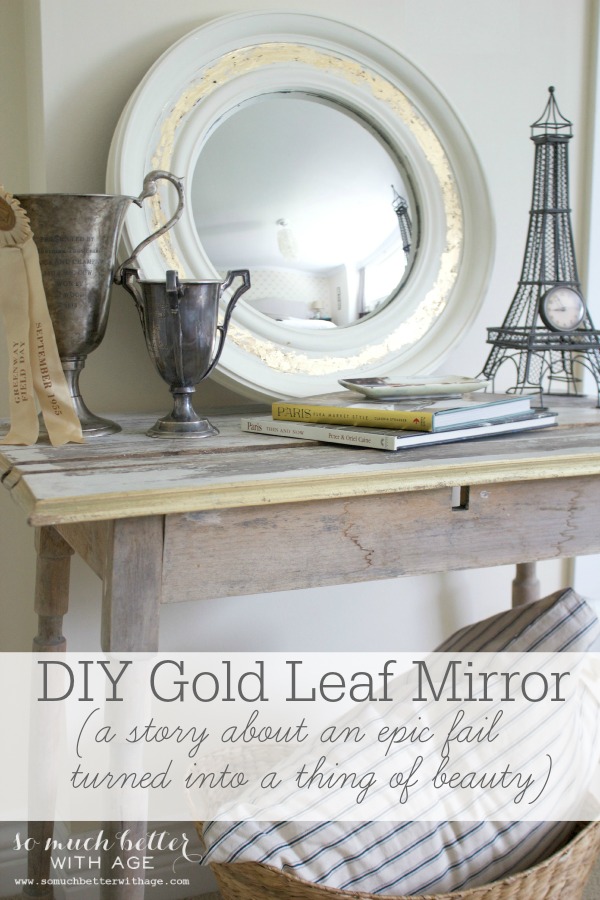
To paint the mirror, I used Annie Sloan Chalk Paint in Old Linen, two coats to paint the dark part of the frame .Once it dries, I wet sanded just the inner circle area to reveal the gold leaf. I knew that some of the dark wood would show up too.

Gold leafing can be addictively fun! Also try these Gold Leafed Wine Bottles
That’s okay! Just add some more adhesive and golf leaf.

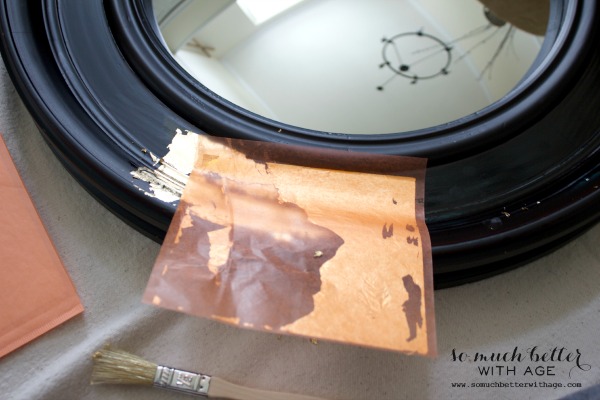
Then just scrape off the paint on the mirror with a plastic spatula (use plastic so it doesn’t scratch the surface). Feel free to add painter’s tape around the side of the glass or the mirror frame if you don’t want to scrape it.

And finally my epic fail turns into a thing of beauty!I love that you can see the bits of dark wood underneath and the different layers of gold leaf. It’s so pretty with the gold finishes.


So needless to say, I’m very happy with the finished results (even if it did take an eternity!) Thanks for listening and hope you can turn an epic fail into a thing of beauty.

*** Editor: The fun part about gold leafing is that it can be applied to a variety of surfaces! From making Christmas ornaments, to decorating a wood tray, gold leaf has been used for centuries to turn ordinarily wood items into items of beauty. While gold leaf is one way to make something pretty, you can also use copper or silver leaf as well.***
You might also like:
DIY Envelope Pillow Cover Tutorial
Painting Wicker Driftwood Grey
Looks amazing Jamie – I know the feeling of that almost fail! You certainly turned that around!!
Thanks Krista!! hugs,
Jamie