Embossed Haunted House Canvas and Halloween Mantelscape
I am participating in the Wagner HT400 heat gun contest! Myself and 5 other bloggers are competing to see who can make the most unique piece of Halloween decor with the Wagner heat gun( I would love it if you would vote for me… Voting starts October 1st, link to the IG page is at the end of the post.). I created this Halloween mantelscape with two projects. In this post, I am going to share with you how I made this embossed haunted house canvas!

(this post contains affiliate links)
I always love finding new ways to put paint and other mediums on canvas, and the haunted house canvas would be the perfect addition to my Halloween mantelscape. This was fun to paint, and emboss it. I used Wagner’s HT400 heat gun to emboss the moon and the windows. If you haven’t tried embossing, it’s pretty addictive, almost like the gold leafing on these spooky book covers!

I started out by rolling dark gray paint out onto the canvas.

I then used a pencil to sketch in my rough shape of a haunted house and tree.

Once I had everything sketched in, I used black paint and a brush to fill in my outline.

I painted a spooky tree on one side, because there is always a spooky tree next to a haunted house, right?

Once the haunted house was painted, I used gray paint to fill in the windows. For the bottom of the canvas, I dry brushed the paint on to give it a patchy, moon-glow look.

Once the windows were painted, I then painted a moon on the other side of the house over the roof all using light gray paint. When the paint is dry, it’s ready for the next step. There are a few ways to emboss. One is to use an embossing pen, or ink pad, and the other (for large areas) is to use just water. You just have to work a little faster. I use both methods in this project.

The idea of embossing medium is to give the powder something wet to stick to. Otherwise, it would just blow all over the place. For the moon, I used a brush and plain water. Just make sure to use a very very thin coat of water, and apply to exactly where you want it.

Sprinkle your wet surface with the embossing powder, I used silver. Then, shake the excess off onto a large plastic tray, tapping the back of the canvas. This is so you can pour the excess back in the jar to use later.

Use the heat gun on the lowest setting following manufacturers directions. Moving it around the area you want to emboss. You’ll see the powder start to bubble and melt. It’s kind of a really cool change that you can see happen right before your eyes. Keep the gun moving slightly a little until it’s all melted. A precaution with embossing powder is to not linger too long in one area, or your powder can burn, and get a brown tinge you can’t get rid of.
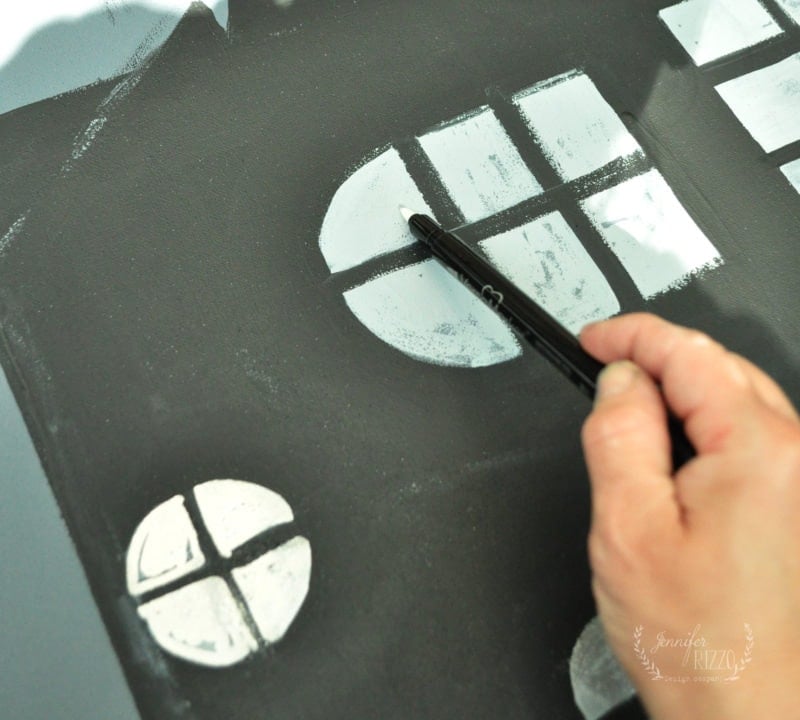
For the windows on the mansion, I wanted to make them look old and streaky, so I used an embossing pen to have a more accurate placement of my window streaks.

I sprinkled embossing powder on the pen-marked area, and then shook the excess powder of the canvas into my tray.

Once the embossing powder melted, it left a nice streaky effect on the windows.

It was a fun way to add texture to the flat canvas, and it really adds something to my Halloween mantelscape and faux fireplace decor, especially when paired with the DIY drippy mantel candelabra.

If you check out this post, you can grab the printable templates for the haunted mansion, the paper bats, and grab a free printable of the mansion itself!

I hope you loved this embossed haunted house canvas project, and it inspires you to make your own! If you love painted projects, check out this one on how to paint a pumpkin canvas.
To vote, head over to the Wagner Spray Tech Instagram page, and make sure to like my project!

can you include a link to their page for voting?
I can! Thank you Missy!