How to Paint an Easy Pumpkin Canvas with Step by Step Instructions for Beginners
One thing that always adds the perfect touch to fall decor is some awesome art. There are so many great subjects to paint, and pumpkins are a great one because you can display them at the start of fall and have them out all of the way through Thanksgiving. It’s much easier than you thing, and I swear, you can paint a pumpkin canvas with just a few simple steps of painting shapes in this step by step tutorial and it’s a great subject for beginners! I am going to show you how easy it is just by painting letters of the alphabet and we are going to jump right in with paint, no sketching or drawing first!
To paint your own pumpkin canvas you just need a few supplies !!! The video below shows a bit more of the process,and I also show you how to under-paint to give your painting greater depth. While this is how to paint a creamy white pumpkin, it’s easy to apply this technique and pick different paint colors to make an orange, green or even blue pumpkin. Whatever color palette you pick, have fun with the process, you can always paint over it! I can see how much my painting has improved in just a few years with practice. You can find supplies here, or go to the supply list below. Also, if you want to add a cute owl to your artwork, check out these cute coloring pages from the Graphics Fairy. One has a sweet owl that would be so cute to add to your pumpkin painting, you could use it as an outline.

(this post contains affiliate links)
Supply List
-Acrylic paint or craft paint is also fine to paint with you don’t need a fancy paint set
–Titanium White, Sap green, Aqua blue / turquoise, Burnt umber or Burnt Sienna (a dark to medium brown). That’s it. Just 4 colors
-A flat brush size 3 or 4 and a flat wash brush
-A cup of water
-paper towel for drying brushes and mixing paint
-Something to mix paint on like a paper plate

You can also watch videos here of how to paint with a palette knife instead of a brush for a more rustic looking pumpkin on a black background.

When painting a pumpkin on a canvas, think about it as painting a series of shapes instead of the entire thing at one time. It makes it so much easier that way to be relaxed about painting. Remember, pumpkins don’t grow symmetrical either, so if yours is a little lopsided, that’s perfect!
Start by just squirting some dollops of the blue and white on the top 2/3 of the canvas and blend your strokes with the wash brush.

As I blend the paint together, I can adjust the background. If I want it lighter, I add more white, and if I wanted it darker, more blue or sometimes even a touch of burnt umber into my blue to deepen it a little.

Then add the Burnt Umber to the bottom third of the canvas to create a surface for your pumpkin painting to “sit on”. This creates a wood background look for a tabletop. It’s ok if some white pops out from underneath, this gives it some texture.

Let it dry before jumping into the next step so the paints don’t blend or become muddy.
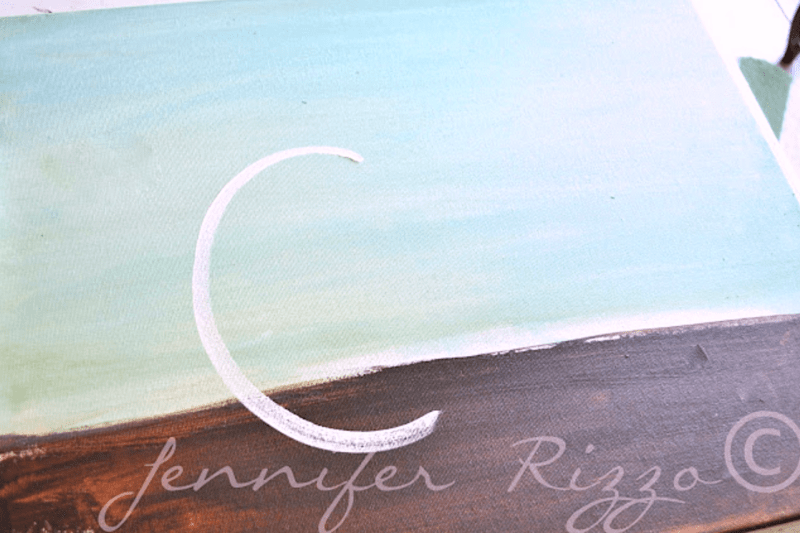
When you canvas is dry, take some of your white paint and your flat paintbrush and paint a “C” shape over both the blue and brown ares you’ve already painted.

Then do the same on the opposite side, painting a reverse “C” shape. The will create the outside edge of the pumpkin. If you want a taller pumpkin, stretch them up and make them closer to each other.

At the bottom,connect them with a little bump and then make a smaller “c” on the inside. These brushstrokes will give you the shape of your pumpkin and create the pumpkin “ridges”.
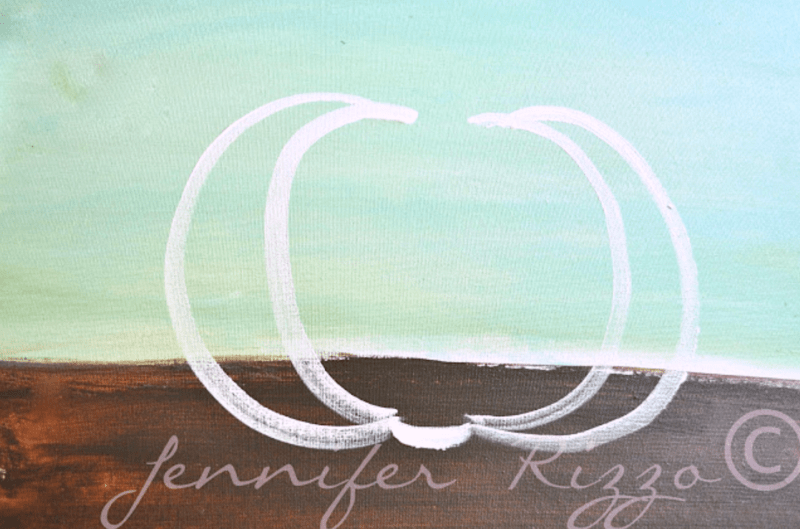
Repeat again with smaller C’s on the inside, connecting then in the middle. The middle C’s of your pumpkin canvas painting actually form to kind of a football.
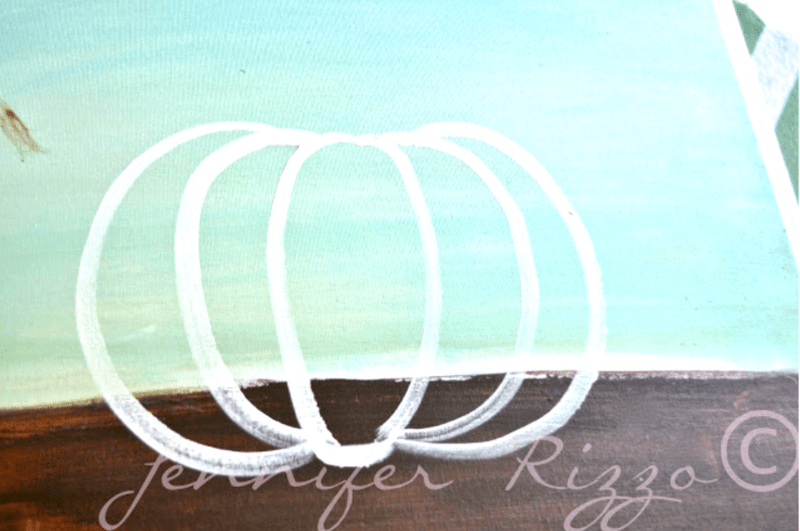
And you have your pumpkin shape!!! The rest is just painting in the basic shape of the pumpkin!

Take more white paint and start filling in the first section.

When you have completely filled in one section,without cleaning your brush, pick up a dab of green and follow the outside edge all the way down. This will give your pumpkin some definition against the white background as you paint a pumpkin canvas.

Wipe your brush off,Then take a dab of brown(burnt umber) and follow the inside edge to add some darker shading and depth.
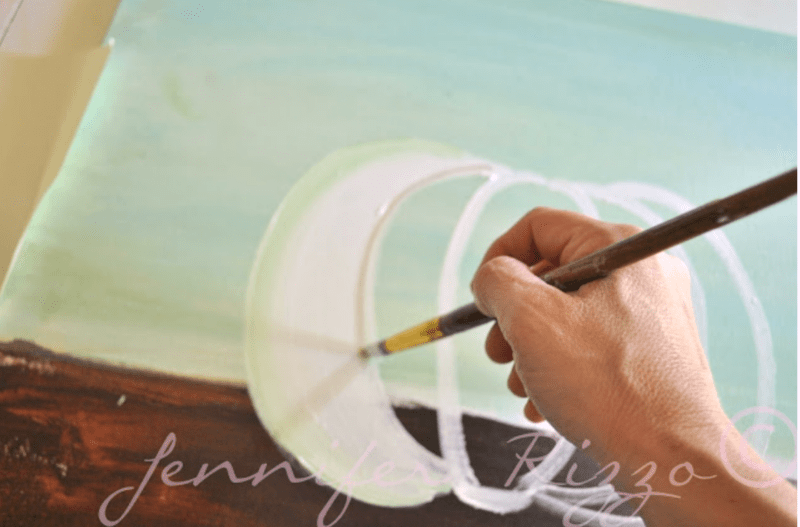
Fill in another section,Then go right behind it with another dab of green. Can you see the shape emerge with the layers of paint?

Continue this way all the way around. You might notice as I fill my colors mix a little and that’s okay. It gives the color some shadows and depth. If it feels too “shadowy” go back over it with the lighter shade of paint.
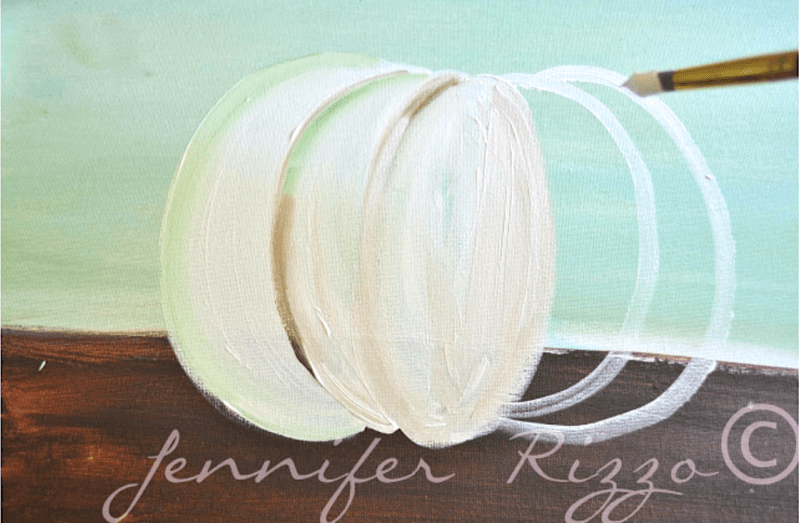
Once your pumpkin is filled in you’re ready to paint your stem, and shade the bottom of the pumpkin to anchor it to the table.

Grab some brown with your brush and shade the bottom.

Just brush it on in an upward motion until it’s blended how you like it. If you feel the brown is mixing in too much, let it dry a bit and go back and go over it with a little white paint.

Sometimes with paint it’s good to take a break and assess what works and what doesn’t work.

Once that’s dry, the painted pumpkin canvas is ready for a stem!

Take a bit of green and just follow the edge at the top of the pumpkin. The more uneven the better. Painting a pumpkin is not about perfection.

Then, pull your paint up and taper a bit as you go. Stems should be fat on the bottom and skinny at the top. Think about it as painting a triangle shape.

You can stop here to look like a green fresh stem, or you can add a little brown paint to make your pumpkin stem look older and a little more dried out.

Add brown paint to the “underside” of the pumpkin stem to darken it and add a shadow.

Add paint it on the entire underside. I did darken my pumpkin under the stem area a little.

Then you can add with I call “Old stem squiggles” by just looping your brush in a curly-que.

Once you are done, you can figure out if you want to add anything else. For Halloween you could add a jack o’ lantern face.
I decided to go back and darken my top a little to accent it more, and at some point I smeared brown paint on the blue, so I decided to work with it and smear some brown on the canvas.


You can also add a touch of white to highlight the stem a bit.

And let dry! You have your own custom pumpkin canvas! When decorating for fall, it goes perfectly with my fall collection of pillows!

If you don’t want to paint your own, you can buy a pumpkin pillow and canvas here!

Happy Painting!


It makes such a great statement piece over a mantle or buffet.And you can do it in any size you like!You can also sit with the kiddos and pull out the paints and have a fun afternoon as well. If your looking for a few fun fall crafts, you can make your own twig wreath from branches from your yard, paint a pumpkin topiary, or make a twine wrapped pumpkin.or even paint a pumpkin pillow!
If you like this post, you might also like:

And
Monday, Sept. 9th Shannon @ http://www.foxhollowcottage.com
Wednesday, Sept. 11th Jen @ https://jenniferrizzo.com
Thursday, Sept. 12th Kristin @ http://myuncommonsliceofsuburbia.com
Friday, Sept. 13th Maryann @ http://www.domestically-speaking.com
Monday, Sept. 16th Kristin @ http://www.yellowblissroad.com
Tuesday, Sept. 17th Vanessa @ http://www.atthepicketfence.com
Wednesday, Sept. 18th Heather @ http://www.settingforfour.com
Thursday, Sept. 19th Mary Beth @ http://cupcakesandcrinoline.com
Friday, Sept. 20th Becca @http://www.adventuresindecorating1.blogspot.com
Monday, Sept. 23rd Kristen @ http://www.ellaclaireinspired.com
Tuesday, Sept. 24th Angelina @ http://jojoandeloise.com
Wednesday, Sept. 25th Courtney @http://www.frenchcountrycottage.blogspot.com
Thursday, Sept. 26th Debbie @ http://debbie-debbiedoos.com
Friday, Sept. 27th Kim @ http://sandandsisal.com
If you are reading this post at any other sites or blogs besides Jenniferrizzo.com, your rss feed,e-mail or in your reader this is stolen content.
*This was posted Via Jennifer Rizzo. com


Fantastic project and tutorial, Jen! Pinning to try out soon!
xo Heidi
Hello Beautiful! I definitely want to try this. You make it look very easy.
The pumpkin is so cute!!! I love it!!
You did such a fabulous job.
Kathy
Fantastic! I THINK I may be able to do this! Thanks for sharing!
Wow, This is so great! I love the look of your pumpkin.
This is fabulous ! I might have to give it a try !
Love it, Jen! Thanks for the step by step. Your instructions are so clear maybe even I can do it!
Jennifer,
How fantastic is this. You make that look so easy. Love the step by step. Thank you.
Kris
Beautiful! I could probably paint the pumpkin but not be able to add the depth and colors like you did Jennifer. 🙂
Looks great…Thank you for sharing!
Very cute! Thanks!
I am new to your site, and it is wonderful!! I am going to try this even though I’m a horrible artist. You make it look very “do-able”. Would you mind listing your exact color names/brand that you used?
Thanks for the inspiration, Steph
Jenn this is absolutely stunning! You make it look so easy I could actually maybe do this! Thanks for the fabulous tutorial.
XO
Kristin
Love this tutorial – many thanks!!
Thank you for this tutorial Jenn! I have almost everything on hand and can not wait to make one.
This is really cute – thanks for the tutorial! And your Grandma’s gonna smack you! 😉
WOW, that looks like it takes some skillz to me…it is beautiful, and you give a fantastic tutorial.
Absolutely gorgeous, Jen!!! PERFECTION!
That is so pretty Jen. It’s simple and full of beauty. What a WONDERFUL step-by-step tutorial!
love this…thank you so much for sharing. definitely want to try this!!!
I TOTALLY LOVE this! And, am so going to paint this 🙂 Thanks for sharing! Life to the full! Melissa @ DaisyMaeBelle
Jennifer! I have always wanted to paint, but have zero painting skills. However, you made this look so doable that I am going to try it! Thanks so much for such a great tutorial!
Karen
Jennifer! I have always wanted to paint, but have zero painting skills. However, you made this look so doable that I am going to try it! Thanks so much for such a great tutorial!
Karen
Lovely. I am seriously going to follow your instructions and see if my pumpkin looks half as good as yours!
how generous of you to share this tutorial! i would really like to try this! thanks for sharing! your painting is beautiful!
You are most generous in sharing your painting skills – wonderful tutorial – thank you. I have a canvas just waiting for this project. Judy/Texas
Love this! SO very pretty!! Thanks so much for the step by step! 🙂 xo Holly
Oh I’m soooooo going to be trying this!! I’ve always been intimidated by painting but really want to give it a go. Thanks so much for sharing this awesome tutorial Jen AND for showing off this gorgeous art! 🙂
Vanessa
I have a girl’s weekend coming up and I am trying to think of a craft. This is exactly what we will do while sipping wine. Thanks for the great step-by-step tutorial.
It’s absolutely beautiful~ and you make it look so easy! I am loving it~ thanks for sharing how to make one of our own!!
Beautiful! THanks for an awesome tute!! I’m intimidated by painting but now I think I’ll try it! Thanks for the tips! Heather
This is so pretty, Jennifer. My little guy loves to paint and I may try this with him or let him do it on his own. Wonderful and easy to understand tutorial. Thanks so much for sharing.
Beautiful pumpkin Jen! You have inspired me to get painting again!
xx
Anne
Thanks Anne!
Amazing job, Jennifer. One of my “talents” is that of decorative painting, and unfortunately, it is very hard for other’s painting to impress me. Your pumpkin looks fantastic, though, and is even better knowing that it wasn’t an extremely difficult project. The white pumpkin against the blue background is very eye catching. And the brown paint that you “smeared” on was the perfect final touch. Beautiful!
Jamie
Thank you so much Jamie!!!
Thank you, Jen, for the inspiration to try painting again! I just spent the evening following your step by step and I must say my pumpkin actually looks cute! 🙂 It turned out so well & my husband & daughter were so impressed! 🙂 It only turned out so well because of your wonderful tutorial!! That was so much fun!! Hope you’ll post more painting tutorials!!
How creative!!! You make me believe I an paint too!
This is So AMAZINGLY BEAUTIFUL!!!! I LOVE the colors the look, EVERYTHING!!! Fantastic Tutorial!
Happy Fall!!
xoxo
THank you Angelina!!!
Thank you Jen for this project! I found it on Pinterest. I have recently challenged myself to put my pins into actions and your pumpkin was my first pin I actually completed since! I love how It came out and you are correct, you don’t need art skills to complete! THANK YOU for these easy tutorial! Fall here come!
I had already pinned this, but I forgot to tell you how much I LOVE it! So pretty! pinning again!
Jen, thank you for this wonderful painting tutorial! The white pumpkin is lovely (great change from orange….genius!)) & the colors are so simple & soft. I do decorative painting on furniture, but have never attempted anything on canvas. I will try my hand at painting it this week, just picked up all my materials & I am really jazzed!! Thanks for all the creativity in your Blog, and I am enjoying following you on Pinterest!
God Bless,
Victoria
P.S. Please do additional painting tutorials, we need your inspiration & creativity!
You are so welcome! Thank you!
Well I completed it! It turned out really good, but could have been bigger on the canvas. I put it on a high shelf with various sizes of white ironstone pitchers on each side. It looks FAB. My friend Jodie is begging me to give it to her, maybe I will have to paint one just for her. Who knows, maybe I will attempt more art on canvas! (Right now I am redoing the paint design on my coffee table for an update & change. This is the 3rd design in the last 14 years, I love it each time!!) Again, I must say ,keep the projects coming! I feel very inspired…
I am so glad!!!I hope you link it up next week!
Thank you. Looking to do this with an orange…would I keep the greens and browns in the pumpkin? Love your instructions.
HI Elaine,Thanks! I am not sure what you mean? On an orange pumpkin?
Greetings from Canada Jennifer … I am new to pinterest and just had a wee peek at the tutorial you did for the painted pumpkin on canvas. Thank you for your creativity and for sharing such a lovely gift. You made it look possible to do and I intend to give it a try very soon.
Jayne
Thanks Jayne! I am so glad you enjoyed it!
OK YOU! You convinced me! I am going to try to paint a pumpkin! Thx 🙂
This is amazing thank you for posting this! I finished mine today and have it hanging in my entryway, looks amazing! I love the fall and the colour twist you put on it!
I love it!
Thanks for the tutorial. I loved your pumpkin painting and gave it a try. You can see mine at http://thriftyparsonageliving.blogspot.com/2014/10/diy-fall-artwork-painted-pumpkin.html
It’s not as good as yours, but I had fun painting it. Thanks for your help.
Joy
I attempted this today and although it doesn’t look nearly as good as yours, I’m still very pleased with it. I invited my mom over and we made an afternoon of it. We loved the easy to follow step-by-step instructions. Thanks!
I am so glad Jen! It sounds like you had a great time!