Flying Paper Geese and Winter Moon Mantelscape
Decorating between Halloween and Christmas can be a challenge. While in the past I’ve decoratewith traditional late fall decor like wheat and leaves, this time I was inspired to create a mantle display that had the magical quality that late Fall and early winter nights can have. You know, those clear, crisp fall nights before the snow comes when the evenings smell slightly of wood smoke, and when the leaves crunch under you feet. The Flying Paper Geese and Winter Moon Mantelscape reminds me of the line from song from the Sound of Music “My Favorite Things” …Wild geese that fly with the moon on their wings. I’ve had so much fun working with paper with my A Creative Paper Holiday online workshop, that I knew geese made of paper would be the perfect accent. I love how this creative mantel idea turned out, especially with a dark wall with a sparkly moon and “birch” trees on the natural wood mantel. I wanted to share with you how I made each piece and pulled the mantelscape together. You can watch a video of the process start to finish as well below.

This post contains affiliate links. See our sponsor and affiliate disclosure here.
Creating the Glittery Winter Moon out of Foam Board
The moon was the first part of the mantelscape I built. I first drew half circles on two large pieces of foam core and then cutting them out.

Both sides of the half circle were matched up and then attached together with masking tape. I knew I was going to be covering over the tape, so I wasn’t worried about using something more transparent. I did add two painter’s stir sticks on the back across the bend to make it more stable. If you make this and your moon isn’t perfectly round, that’s okay, really. It’s handmade. My moon isn’t 100% perfectly round, and I’m okay with that.

The nest step was to add texture to the front of the moon. I had spackle on hand but you can spread either drywall compound or spackle on the moon front and let dry completely.

When the spackle coat was completely dry, painted over the entire surface with white paint and then pounced yellow ochre on in a random pattern, leaving patches of white showing through.

Then came the fun part! While the paint was still wet, I sprinkled a dusting of glitter in various places on the surface of the moon. I left it to dry flat overnight. I did have some slight curling of the foam board edges, but not enough to make a difference.

Spray painting River Birch branches to make mini-trees
While the moon is drying, I gathered some fallen birch branches from the yard, and then used white spray paint to completely cover them. We have a River Birch in the backyard and it sheds a ton of little branches all of the time. Luckily,they have a great shape, and I can always find a use for them from vase fillers to craft projects! When gathering them, I looked for some that little branched on them and resembled mini-trees.

I spray painted them outside where it was well-ventilated. First painting the one side, and then when it was dry, flipping them over to paint the other side for complete coverage and let them dry completely for a few hours.
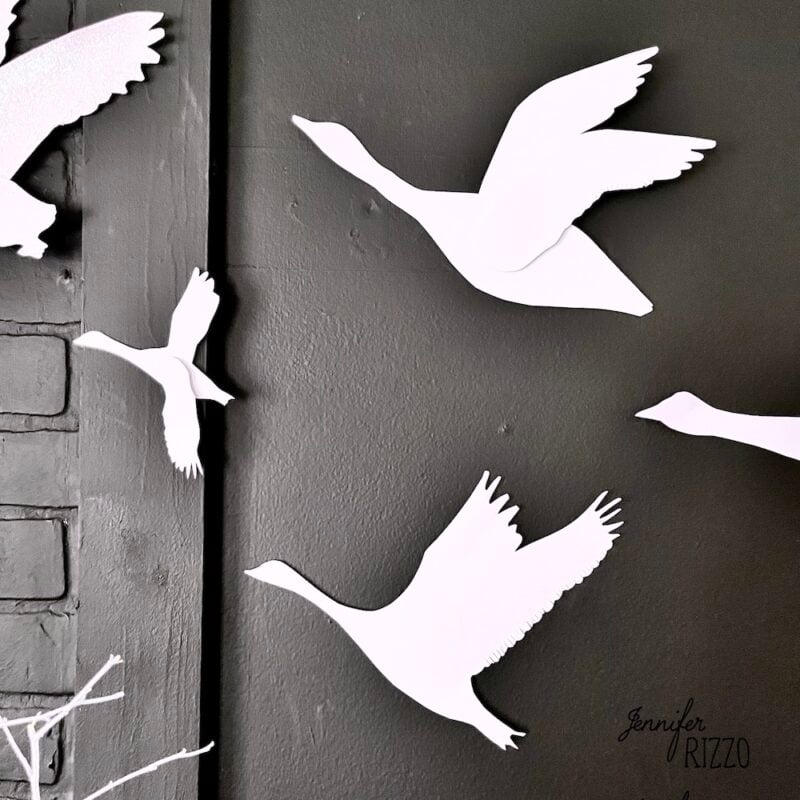
Cutting and Assembling the Flying Paper Geese
I sketched my geese on white card stock. I decided to make different size geese and make some of them with wings in various positions so they looked like they were a flock of in flight. Some of them I left as plain paper, but I also wanted to glitter some of them as well for my flying paper geese and winter moon mantelscape.

While the larger geese used multiple sheets of paper for the body and wings, I was able to fit multiple smaller geese on one sheet of paper. Once they were cut out. I glued the wings to the body. To attach some of the wings to the goose (geese?) bodies I used raised glue dots to give them some dimension. I love the effect it has!

One of the fun touches I added to the wings was using fringing scissors. Fringing scissors are so fun because it’s like cutting with 6 pairs of scissors at once. I made these super cute fringe trees with them and they are still as favorite project of mine. They made a nice feathered edge detail on the wings. You can find them here on Amazon.

Once the geese and wings were cut out, I added glitter to the smaller geese with a pretty crystal glitter. Once everything was dry, it was time to pull all of the pieces to be put together.

Putting the The Flying Paper Geese and Winter Moon Mantelscape together
Hanging the geese was super easy. I used double stick tape to hang the geese since they were so light.
I had hot glued a saw tooth hanger on the back when it was completed, and it made it really easy to hang.

Once the moon and the geese were in place, I added the white spray painted birch branch trees. To make them stand up and keep them in place I used air dry clay on pieces of cardboard.

This way I was able to place the branches in the clay and squish the clay around the base of the branch. it also made it easy for me to play with the spacing of the “trees”. I added my taller trees to the far end of the mantel to balance against the geese on the other side.

Once the branches were in place, I covered the clay and mantel top with green and gray mosses. I like how it looked woodsy, like it was still late fall, but the weather was changing.

I had a few wood mushrooms I bought earlier this year, and tucked them in the moss. I love how their little wood tops poke out from the greenery. You can find similar ones here on Etsy.

I have to admit. This is so much fun and so different! And I love that it feels kind of wintery, but is not Christmas.

I think the white really pops too against the black paint. It might be my new favorite mantelscape yet!
If you’re looking for more holiday crafting and decor, you might love my new online workshop: A Creative Paper Holiday.

Jen, I think this might be one of your most creative and beautiful creations. It is truly wonderful.
Thank you so much Pat! I enjoyed creating it!
Your mantelscape is absolutely beautiful. It would be a wonderful winter decoration after Christmas as well. It’s just too pretty too leave up for only a couple weeks!
Thank you so much Joan! I agree with you, I would love to use it again!
I really love this. The geese are fantastic. I am pretty sure you could sell them as a kit.
Thank you Becky!