How to Paint a Fun and Easy Acrylic Agate Art Painting
Here’s a little known facts about me,I have a side to me that is a complete science geek which makes me love this agate-inspired pattern even more. I started collecting rocks,minerals and gems when I was about 12 years, and then when I hit 14, I continued kind of secretly until my 20’s, when it wasn’t a very cool thing to do. 🙂 It’s actually how I started making jewelry when I was around 14. I would go to rock shows(not the cool concert kind) and buy gem stones and findings and make creations in my parent’s dark basement for hours. I even subscribed to Rock and Gem magazine. Oh, what was that,what’s hanging out? Oh, my inner geek is showing? Let me tuck that back in, Thanks.:)So, there is still that inner rock lover in there and I thought it would be kind of fun to see if I could mimic the natural patterns of agate in an acrylic painting. So here is the super simple tutorial on How to Paint a Fun and Easy Acrylic Agate Art Painting!
This post contains affiliate links. See our sponsor and affiliate disclosure here.
I kind of like this project for how fun and messy it is too! And it makes nice piece of modern,abstract art. If you don’t want to make agate art, you can find beautiful,similar art canvases here. You can also grab this free abstract art printable here. I was very inspired by the patterns in both Blue Agate and Malachite. I decided on the Blue agate for this canvas. You can watch this video for the basics of the technique, and then see the step-by-step below. It’s really easy, but very messy! So if you like getting paint on your hands, this project is FOR YOU! You can also see how to paint a brush stroke abstract painting as well.

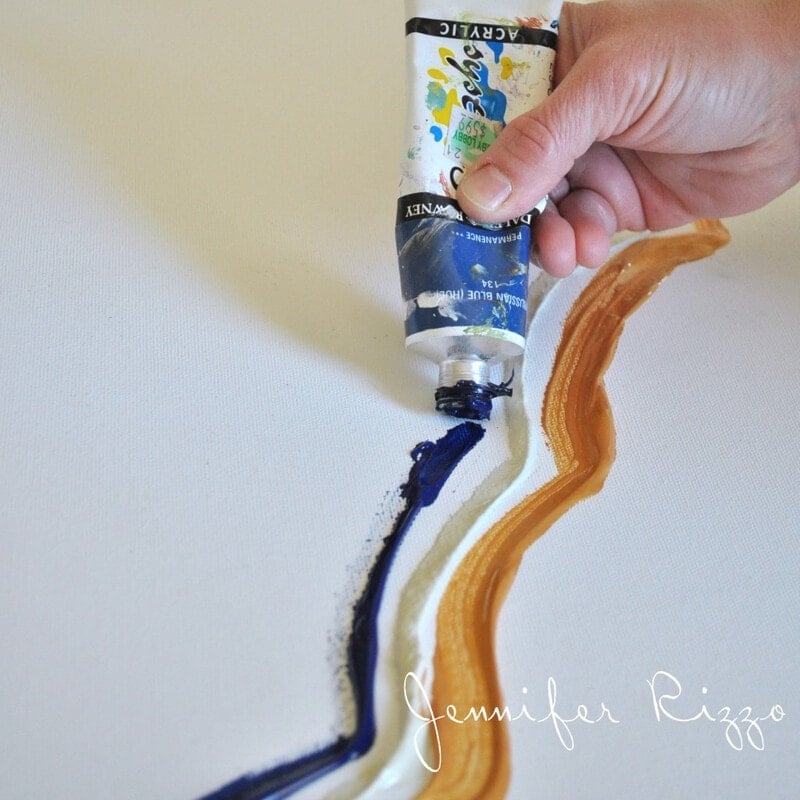
Start by using your paint tubes of medium body or heavy body acrylic paint and start “drawing” lines on your canvas, one after the other in the pattern on your “inspiration” stone. Pick colors that seem to go together in the stone. For my blue agate, I chose Gold, Grey, White, Teal, Aqua, Light Aqua and Bright Blue.

After you’ve drawn all of your lines, have everything ready. You’ll need lots of newspaper under your canvas to catch the paint you pull off the edge, and a piece of cardboard. I just used a box flap. The next part are some really simple steps to make your agate wall art!

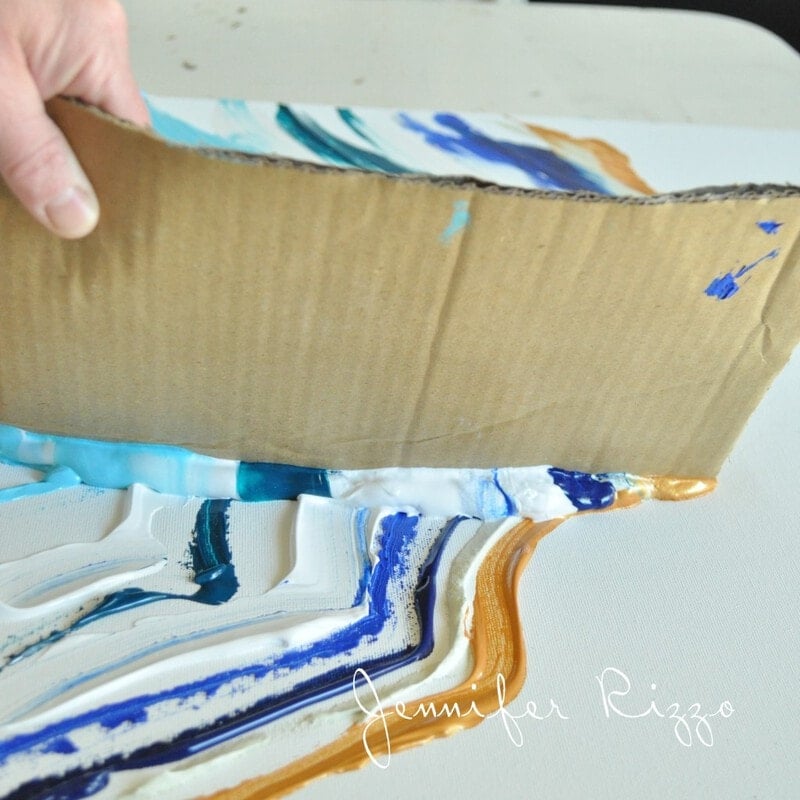
Start at the edge, and with firm and even pressure, pull your flap across your paint, with a bit of a scoop movement to make the agates “waves”.

Here’s a view from the other side.You might have to re-drag once or twice, but don’t re-drag too many times, it blends the paint too much and you lose some of your line definition. I had that happen with my first pattern and I learned better for my second!

See how much paint your end up dragging off? Keep this and use it for another project like coasters or create abstract art with matting.

If you doing acrylic painting right, your hands will always look like this. 🙂 Let your first set of striations and paint pulls dry.

Once your paint is dry, you can start on your second pattern the exact same way.

If you pull your acrylic paint correctly for your agate art and don’t over-blend, you get a great 3-D effect. I ended up lining the edges of all of my ‘rocks’ with gold paint to tie everything together. I also mixed up the colors and patterns a little bit. It was really fun even if it does waste a ton of paint.

I like the pattern on the bottom right the best. It looks the most realistic.3rd times the charm! I spray painted a little glass dish I had with some gold spray paint to go along with it.

I just love the organic feel to it. You can see how I made glass plates that resemble framed agate slices.

And i’sa really fun project and a fun technique to play with! You can paint smaller versions and place them in frames, or leave them as just the canvas. I have also noticed agate sloooowly creeping into home decor as well, like on this pillow, so I wanted to show you how to paint this fun acrylic painting of an agate-inspired striated pattern on canvas. You know I love a good painting project! Like how I used Pouring Medium to make this realistic faux marble table!s
Love the pattern?You can find an agate-inspired pillow here. For another fun technique, you can learn here how to make a stenciled linen pillow
If you likes this post you might also like:


Absolutely gorgeous!
That idea of using a trowel type of tool would have never crossed my mind. Brilliant! It’s beautiful, isn’t it?
Stunning!!! Absolutely Love it 🙂
LOVE this! i pinned it- i need to make one!
This is such a cool technique. I am an undercover rock lover too. (but I guess I just blew my cover… oops.) You can find geodes and quarts all over my house. Maybe I should add a painting like this to my rock collection.
I am thinking this would be awesome with amethyst colors! I need something to hang on my bedroom walls.
Realmente ingenioso e inspirador…gracias
Me ha encantado la técnica que utiliza Jennifer gracias
How big is the canvas you used?
I’m curious if you moved your trowel in the same wavy motion as you laid out the paint lines or if you pulled straight across the canvas to get this result? I’m willing to experiment but given the amount of paint that gets used, I’d like to experiment less and get it right more!
What a fun art tutorial. I love the texture you created and the colors you chose. Thanks for sharing.
Hello Jennifer,
I was wondering if you care if I put a couple of your pictures above on my blog then a link to your page here so they can come here to see the directions? Also how do you do the middle. ? Thanks for sharing this.
Sure Mickey. I am not sure what part of the middle your talking about?
I really like this! I can’t wait to try it!
I like this idea, at first i was thinking waves in the ocean, you could DEFINITELY do waves with this technique as well. I also want to know if you mean that you swoop the cardboard to match the lines you drew with paint? I am assuming that you did not drag it straight, but followed the lines you drew, but I want to be sure. Also. I recommend having a spare canvas and then dragging the excess paint across the extra canvas. You can get 2 for one and not waste paint. What I do with the random background is put a vinyl monogram or letter on the background and give them as gifts. 🙂 Kids love things personalized with their initials. 🙂 I am definitely going to try this soon. I look forward to your answer.
HI Carol,
I swooped the cardboard. That’s a great idea with a second canvas. I hate to waste paint!
Here is another way to use that extra paint! Prep the canvas with your words, then drag the paint across it.
http://www.thebudgetdecorator.com/12-home-decor-mod-podge-projects/
One more COOL thing I saw that immediately reminded me of your extra paint. 🙂
http://www.beadandcord.com/clipper/cynthia/diy-arts-crafts-11651/83527.html
Okay, that is all. 🙂 I am just inspired and I can not wait to try all three of these. 🙂 Thanks for sharing your cool idea.
When I saw the technique on Pinterest, I immediately thought of malachite. It’s my favorite semi-precious stone!