Monogrammed Vase Made From Plaster And A Recycled Bottle
I’ve been playing around with plaster and molding techniques,which I find really creative and interesting. I came up with this fun DIY monogrammed vase made from plaster and a plastic bottle. The best part is I used recycled goods which includes a cleaned and washed old-school milk carton. If you want to see how to paint a vase to make it look like plaster with a video, check out this post.

(This post contains affiliate links including Amazon Affiliate links. Please see our disclosure here.)
Did you ever make those candles in grade school where you put a wick in the bottom of a milk carton and then poured in the wax and voila, you had a candle? This easy plaster casting idea can also be used with concrete. You might have done this right after you finished a macrame owl project. This is the same kind of premise with molding in a cleaned and washed milk carton. It’s much easier than you think! I used a thick plastic bottle that wouldn’t break when it was cast. You can shop supplies for this post here.
Make sure have your supplies for your vase made from plaster such as your milk container and bottle ready to pour and plaster and concrete set fast.
Supplies For a Plaster Vase
-Crafting plaster
-Gloves/Eye Protection (recommended)
-Wood stir stick
-Washed milk carton
-Plastic bottle
-Stamp pad/stamp
For this project, I used craft plaster from the craft store, not the industrial stuff from the hardware store. Make sure you read all of the instructions on the side and follow all of the safety precautions. I recommend doing this outside and wearing gloves, goggles and a mask because of the dust when mixing. If you are looking for supplies, you can find many of my favorite casting and molding supplies in my Amazon Store. If you want to paint the plaster, I love using Multi-Surface Acrylics™after it’s dried.
Follow the directions on the plaster packaging for best results and to get the proper consistency for your cast plaster vase. Filling the bottle with sand or small stones will help to weigh it down so it doesn’t float up when you are pouring your casting material.

Pour all of your plaster in around the bottle and let it set. Plaster can also expand slightly when it cures and like I said, it also creates heat, so put it somewhere stable and steady, away for children, and leave it be for a few hours.You can even leave it outside overnight if it’s not going to rain and check it in the morning. I will tell you, working with plaster can be interesting, like this huge fail I had in this post. It is really the worst project I’ve ever made in 14 years of blogging. EVER.
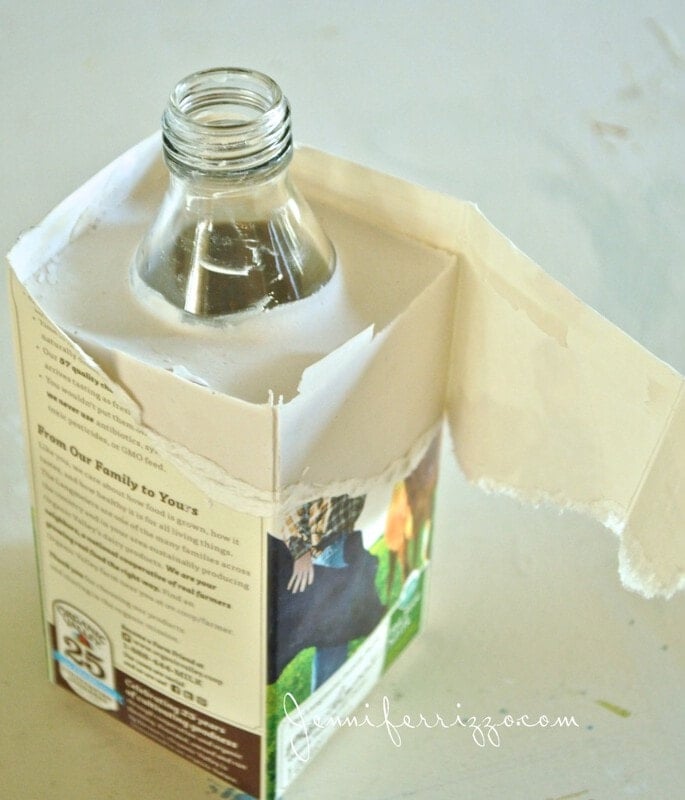
Once the plaster has cured, peel away the milk carton. If you have any edges that are a bit sharp, you can actually give them a gentle rub with a wet paper towel it will knock any edges off, or a wet sanding with sandpaper.

I decided to monogram mine. I will tell you I should have sealed the plaster first with a product like Mod Podge or a flat varnish because it sucked up the ink and feathered a little. It also showed smudges fast too. So make sure you seal before stamping.

Use StazOn Ink it really does to adhere surfaces and doesn’t smudge once it’s cured. If you’re interested in carving your own stamps, you can see this post here.

Once you have your DIY plaster vase stamped, you want to let the ink cure and then seal with a flat sealer. Or you could also paint it. Plaster loves paint!

Once you get used to working with plaster, making a vase with plaster is a fun and easy and inexpensive project!!! If you’re looking for more crafty projects, try string pull painting, or make DIY abstract art.

You can shop supplies for this post here.
If you liked this post, you’ll also love:How to Repurpose Old Encyclopedias, DIY Dried Orange Slice Garland, Chalky Painted Vintage Console Makeover
Or how to make an easy DIY agate-inspired art canvas:


This is just the most creative idea I have seen in a while. It is so chic. I fondly remember making candles this way back in grade school. Thanks for bringing a smile to my face this morning and getting my weekend started off right – INSPIRED!
Thanks Diane!!!
Very cool, Jen! I love your creativity!
Thanks Jennifer, I’m going to make my mom one for her special day!
I am glad! Let me know how it turned out!