Jennifer Rizzo

A DIY,home decor,crafting and decorating lifestyle blog

  • Home
  • Shop
    • Shop Jennifer Rizzo Design Company Online
    • Shop Craft and Art Supplies
    • Creatively Christmas book information
  • Workshops
  • Our home
  • Projects/DIY’s/Lifestyle
    • Printables
    • Craft/home decor projects
    • Room makeovers,before and afters,home projects
    • Furniture makeovers before and afters
    • Art lessons and painting DIY projects
    • DIY wall art
    • Popular recipes
    • Interior design and decorating ideas
    • Entertaining
    • Running a small business,shows and shop keeping
  • Holiday housewalks
    • 2020 Holiday Housewalk
    • Holiday Housewalk 2019
    • Holiday Housewalk 2018
    • Holiday Housewalk 2017
    • Holiday housewalk 2016
    • Holiday housewalk 2015
    • Holiday Housewalk 2014
    • Holiday housewalk 2013
    • Holiday housewalk 2012
    • Holiday housewalk 2011
  • Contact
    • press, speaking engagements,book signings
  • Privacy Policy
    • Affiliate and Sponsor Disclosure

Complete budget bathroom renovations with befores and afters….

September 4, 2013 By Jennifer

Both bathrooms needed total overhauls. Can you say “hot mess”? You know how sometimes you just have to put your head against the wall and bang it a little? Yeah, it was like that,
but booth bathrooms look so amazing now after their renovations I am really excited to show you the completed bathroom renovations!
Two amazing renovations in this house!
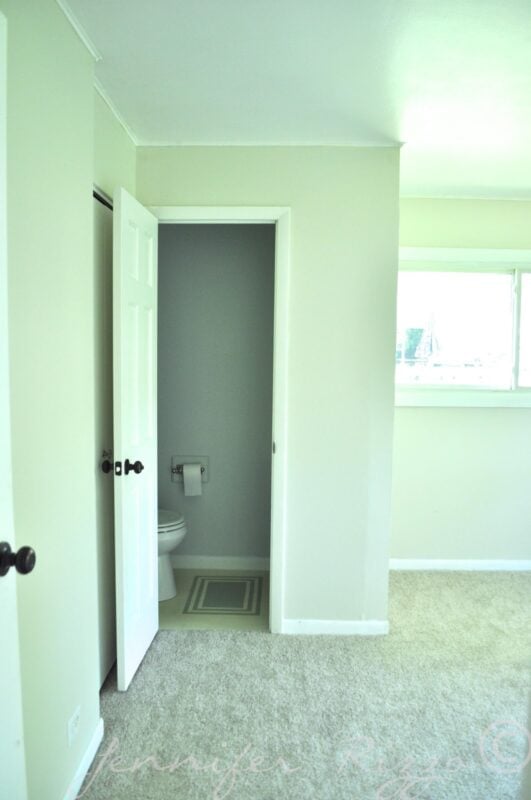
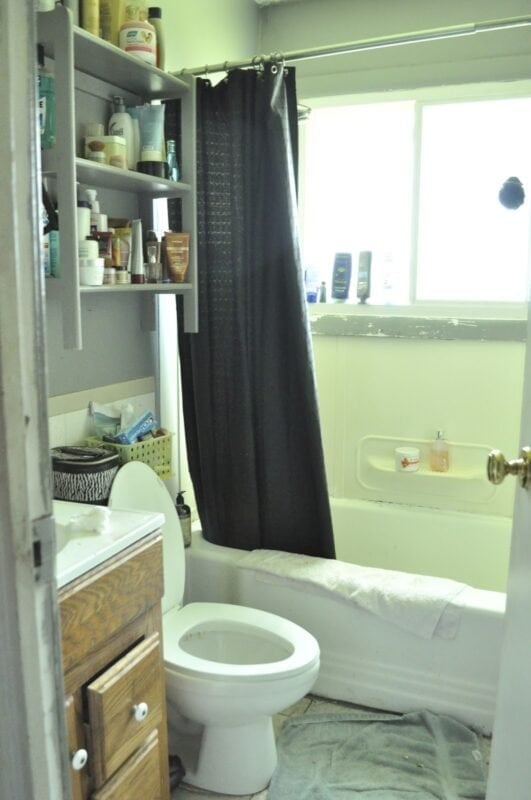
I’ll show you the bathrooms the same way I did the living room ,kitchen or porch so you can see the total transformation!
Here’s the before on the little bathroom first. It’s a cute little add in bathroom in the master.
Soooooo……. you know how stripes have a time and a place? This wasn’t the time or the place. EVER.
Are you dizzy?I’m dizzy.
This old vanity painted for a great update.
 The wood cabinet was in good shape, just really dated. And the counter-top was  also in good shape and a nice neutral color.
Since we were trying to a save a little money and spend it where it was important, we decided to leave those two things in place and just update them

 But we decided the tile back-splash needed to be replaced as well as the light fixture and the faucet.

The first thing I did was REPAINT and put new knobs on the cabinet.
Bathroom cabinet painted in rustoleum flat black
 We also  repainted the floor.
We then popped all of the old tile off and re-tiled and replaced the light fixture with  a restore light fixture.
I hung a mirror from Homegoods , the new toilet was put on and it was ready to go!
It’s now a cute little bathroom for a cute little house.
 We put the same Ashville Moen faucet  that’s in the other bathroom so they matched.
A bathroom update with a Homegoods mirroe
I think this little en suite turned out really nice, but I am thrilled with  the main bathroom!
***

It had an old,gross shower surround that just wasn’t in good shape any more.

When we found out it was going to be over $1000 to have some open come in and put in tile,
That’s when I decided to learn to tile it myself.
The after on this renovation is amazing
 The main bathroom was a complete tear out except the tub(Which we had resurfaced). We also ripped out the weird plastic tile that was in the bathroom.
Luckily all of the plumbing was good so we didn’t have to do anything with that. It was just all cosmetic.
But the surround was just old and gacky,the sink top had burns on it, and the floor had been cracked.
I think they used wall tile on the floor at one time.
First, we removed the surround and replaced the floor.
We used really great Octagon penny tile from Home Depot. It was about $22 for 12 square feet and we did the entire floor with a box and a half
 And faced with the cost of re-tiling,I learned to tile!!! I do  not have a tutorial for this, but I did have sore legs for a week.
I also custom mixed my own grout. I hated the colors in the store and wanted something between two of them. It was as easy as putting the two colors through a flour sifter over and over until they are completely blended. I would do a small test batch and see if I needed to tweek the color a little and then do it again until I had the color I wanted.
Instead of ripping out your tub, you can have it refinished for about $500.
 I after grouted with a custom mix grout  then the tub re-finisher came in and did his magic! It was around $500 and The tub looks almost brand new!
The toilet went back in and we put all of the pretty stuff in!
Here’s the full after!!
The Oak house project full bathroom renovation with subway tiles
 I love the subway tile! I now want to rip out the squares in our house.
full bathroom renovation with a dark vanity  and moen faucets Pretty bathroom update
We also added beadboard and trim to make it pretty.
 I love the simple glass medicine cabinet. The pretty light over it is from Lampsplus.
 $1300 budget bathroom update.
I love the contrast of the dark.modern cabinet with the light walls
The Oak house project full bathroom renovation with beadboard wainscotting
The Oak house project full bathroom renovation with penny floor tiles
 And I love the penny tiles on the floor.
The Oak house project full bathroom renovation with vintage elements before and after pictures
 It was so dark before I really wanted this house to feel light and bright and airy.
The Oak house project full bathroom renovation clean and bright subway tiles
I just think it looks clean and fresh!
The entire renovation was about $1400. The big ticket item was the tub.Otherwise it was a great budget bath update
Here is the break down:
$500 tub refinshing
$300 tile and grout in bathtub
$40 tile and grout on floor
$300 new bath vanity and faucet
$100 beadboard and paint
$150 new potty
I’ll have the full kitchen reno on Friday! I can’t wait to show you that space!
If you liked this post you might also like:
The living room before and after
Livingroom before
The kitchen before and after
Kitchen before
this post was partially sponsored, but opinions are all my own
If you are reading this post at any other sites or blogs besides Jenniferrizzo.com, your rss feed,e-mail or in your reader this is stolen content.

*This was posted Via Jennifer Rizzo. com

Comments

  1. Rita C. says

    September 4, 2013 at 10:49 am

    Oh my gosh, Jennifer, this looks soo amazing. If you read my latest post, you see my fear in just getting some plumbing upgrades. You are fearless! And the white is just gorgeous, as is all of your hardware. I would think your hard work in the tiling should have a great return!

  2. Larissa Haynes says

    September 4, 2013 at 11:24 am

    Doesn’t it feel good to have them clean and fresh?! Excellent work and love the updates. :o)
    Larissa ~ Prodigal Pieces

  3. Emma Kate at Painted Style says

    September 4, 2013 at 11:49 am

    Beautiful! Great job with the tiling!

  4. Soiled Rotten says

    September 4, 2013 at 11:50 am

    So adorable! Loving the floor tiles!

  5. My name is Vee says

    September 4, 2013 at 2:11 pm

    I love it. You did an amazing job. Where did you get the shower curtain and towel. They are adorable.

  6. Vel Criste says

    September 4, 2013 at 2:17 pm

    almost can’t believe its the same space! love all the details jennifer!

  7. Erin~Just*Grand says

    September 4, 2013 at 2:27 pm

    Wow! Great job! Good choices on the materials. think the white is perfect, and I’m sure buyers will think so, too! So fresh and clean! Good luck with the sale!

  8. Emily@TheWickerHouse says

    September 4, 2013 at 3:43 pm

    Wonderful Transformation! Love all the white tile. Cute shower curtain too!

  9. Serendipity Refined says

    September 4, 2013 at 5:57 pm

    WOW! It’s beautiful! No such thing as too much white! Love the shower curtain…and the TILE!!!

  10. Michele @ The Nest at Finch Rest says

    September 4, 2013 at 7:20 pm

    Looks amazing – and white is awesome – peeps may darken with accessories or paint but to have a nice crisp and clean bones base? Brilliant – : – )

    Well done, your hard work sure is paying off – this has been such fun watching this transformation with you, Jenn!

  11. Little Cottage on the Pond says

    September 4, 2013 at 8:47 pm

    I think it’s perfect and the white was a great choice! Loving the updates and reveals 🙂

  12. Nita Stacy says

    September 4, 2013 at 11:58 pm

    Love it and it looks so vintage…which of course I adore.

  13. Dear Emmeline says

    September 5, 2013 at 2:25 am

    lovely transformations!

  14. Amy at Ms. Toody Goo Shoes says

    September 5, 2013 at 11:55 am

    You did a great job in both! Impressive that you did the tiling yourself. I love subway tiles, too.

  15. Anne says

    September 9, 2013 at 12:08 am

    Beautiful job Jen!
    xx
    Anne

  16. Nicole @ Working Kansas Homemaker says

    December 15, 2013 at 9:43 pm

    We too have two bathrooms that need to be re-done. We managed to tear off the wallpaper in our master and repaint it to match the *pink* tiles. It’s just a lot of work and money, but one day I hope to have my own before/after bathroom shots! Thanks for sharing, they both look beautiful.

    • Jennifer says

      December 15, 2013 at 11:02 pm

      Thank you Nicole!

Trackbacks

  1. The Oak House Project Living room reveal before and after….!!! Photo BOMB! says:
    October 20, 2013 at 7:25 pm

    […] and we were so happy to undo them and make it even better. You can also see how we renovated the bathrooms,kitchen and porch. I’ll progress in stages from the before’s to the afters so you can […]

  2. The Oak House Project Before and after kitchen on a budget…..!!!!! says:
    March 14, 2014 at 9:22 am

    […] another photo bomb of before and afters!!!! Here are the links if you missed the living room  or bathrooms or […]

  • Facebook
  • Instagram
  • Pinterest
  • Twitter

sign up for our newsletter and receive a free printable


The 2020 Holiday Housewalk

Jennifer Rizzo + Whimsy Decor for the Holiday Housewalk Day 1

Categories

archives

website security    

***Create at your own risk!!****
Any content on this blog was created for inspiration and entertainment purposes only!
Creating with my or any contributors or guest writers suggested tools, methods, or suggested products is under the reader’s/your own risk.

***************************************
Please do not use any pictures or images off my blog without credit and linking back. Blog name,company name,All original art work and projects are copyrighted and protected works. If we have used an image from your site and you would not like it featured or promoted, please let us know and we will remove it promptly.
*******************************************
I have been compensated for posts featuring products from sponsors such as Michaels Craft Stores and Decoart Brands, but opinions  in working with these are entirely my own, and all sponsored posts are disclosed as such. All other sponsored posts are noted at the end and disclosed. Some posts may contain affiliate links.

Copyright © 2021 Jennifer Rizzo Design Company LLC · Design by Sadie Olive · Log in